SpringCloudNetflix之Hystrix(熔断器)、Zull(网关)、Feign完整使用
Hystrix
简介
Hystix,即熔断器。
主页:https://github.com/Netflix/Hystrix/

Hystrix是Netflix开源的一个延迟和容错库,用于隔离访问远程服务、第三方库,防止出现级联失败。
使用熔断器Hystrix为了优化项目。
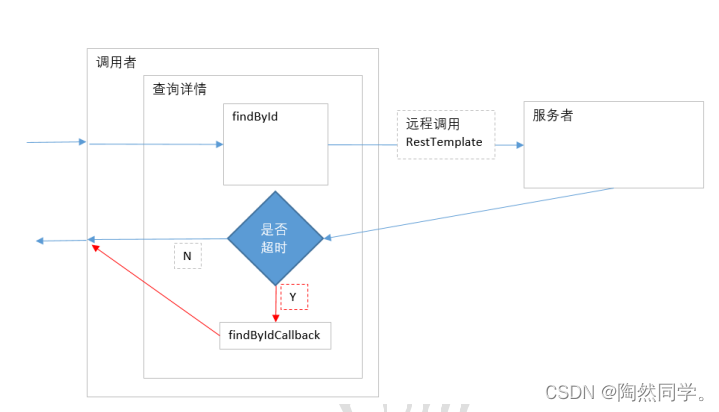
熔断器的工作机制
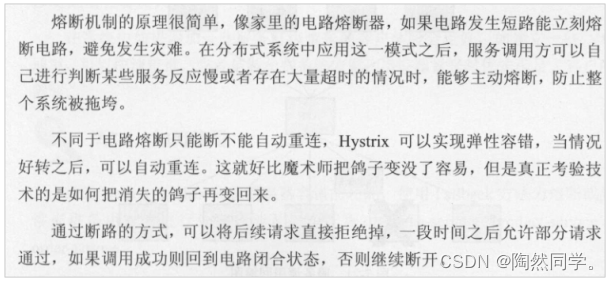
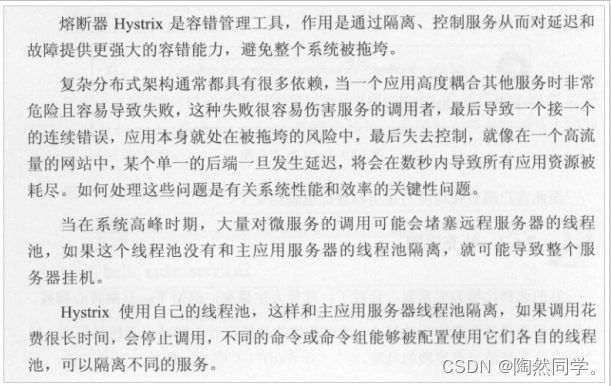
正常工作的情况下,客户端请求调用服务API接口:
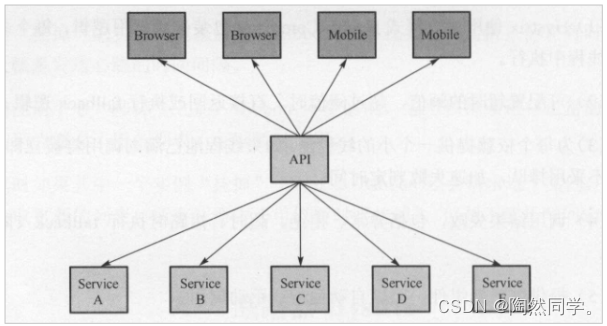
当有服务出现异常时,直接进行失败回滚,00000000处理:
当服务繁忙时,如果服务出现异常,不是粗暴的直接报错,而是返回一个友好的提示,虽然拒绝了用户的访问,但是会返回一个结果。
这就好比去买鱼,平常超市买鱼会额外赠送杀鱼的服务。等到逢年过节,超时繁忙时,可能就不提供杀鱼服务了,这就是服务的降级。
系统特别繁忙时,一些次要服务暂时中断,优先保证主要服务的畅通,一切资源优先让给主要服务来使用,在双十一、618时,京东天猫都会采用这样的策略。
动手实践
引入依赖
首先在student-service中引入Hystrix依赖:
org.springframework.cloud spring-cloud-starter-netflix-hystrix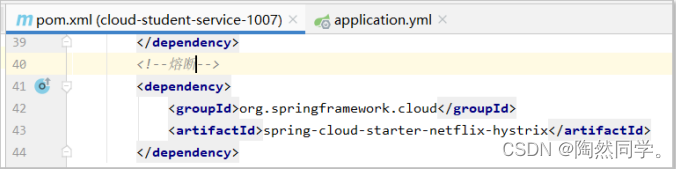
开启熔断
在启动类上添加注解 “@EnableHystrix”
package com.czxy;import org.springframework.boot.SpringApplication;import org.springframework.boot.autoconfigure.SpringBootApplication;import org.springframework.cloud.netflix.eureka.EnableEurekaClient;import org.springframework.cloud.netflix.hystrix.EnableHystrix;@SpringBootApplication@EnableEurekaClient@EnableHystrix //开启熔断器public class StudentApplication { public static void main(String[] args) { SpringApplication.run(StudentApplication.class,args); }}改造调用方
我们改造student-service,修改ClassesDao的findAll方法,并且声明一个失败时的回滚处理函数dataFallback:
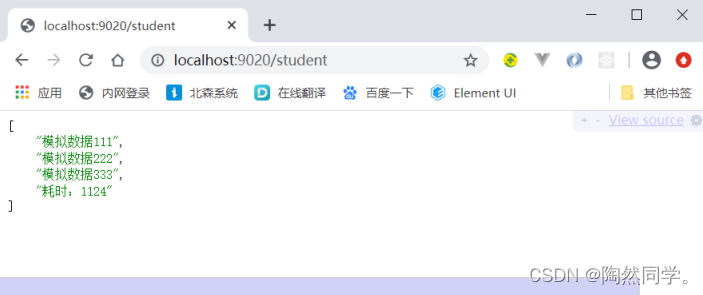
package com.czxy.dao;import com.netflix.hystrix.contrib.javanica.annotation.HystrixCommand;import com.netflix.hystrix.contrib.javanica.annotation.HystrixProperty;import org.springframework.http.ResponseEntity;import org.springframework.stereotype.Repository;import org.springframework.web.bind.annotation.GetMapping;import org.springframework.web.client.RestTemplate;import javax.annotation.Resource;import java.util.ArrayList;import java.util.List;@Repositorypublic class ClassesDao { @Resource private RestTemplate restTemplate; @GetMapping @HystrixCommand(fallbackMethod = "findAllFallback") public List findAll(){ ResponseEntity entity = restTemplate.getForEntity("http://classes-service/classes", List.class); List list = entity.getBody(); return list; } /** * 失败时的回调函数 * @return */ public List findAllFallback(){ List list = new ArrayList(); list.add("模拟数据1"); list.add("模拟数据2"); list.add("模拟数据3"); return list; }}- @HystrixCommand(fallbackMethod="dataFallback"):声明一个失败回滚处理函数dataFallback,当findAll执行超时(默认是1000毫秒),就会执行fallback函数,返回替代内容。
- 为了方便查看熔断的触发时机,我们记录请求访问时间。
- 多学一招:通过@HystrixCommand的commandProperties 可以设置默认时间
// HystrixCommandProperties Hystrix命令参数配置类
@HystrixCommand(fallbackMethod = "dataFallback",commandProperties = @HystrixProperty(name="execution.isolation.thread.timeoutInMilliseconds",value="1000"))
改造服务提供者
改造服务提供者classes_service,随机休眠一段时间,以触发熔断:
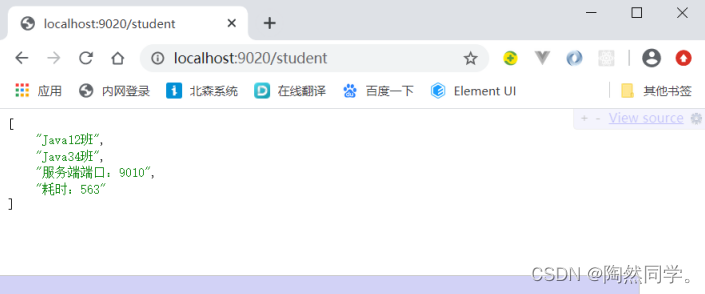
package com.czxy.controller;import org.springframework.web.bind.annotation.GetMapping;import org.springframework.web.bind.annotation.RequestMapping;import org.springframework.web.bind.annotation.RestController;import javax.annotation.Resource;import javax.servlet.http.HttpServletRequest;import java.util.ArrayList;import java.util.List;import java.util.Random;@RestController@RequestMapping("/classes")public class ClassesController { @Resource private HttpServletRequest request; @GetMapping public List findAll() throws InterruptedException { // 模拟网络延迟 Thread.sleep(new Random().nextInt(2000)); List list = new ArrayList(); list.add("Java12班"); list.add("Java34班"); list.add("服务端端口:" + request.getServerPort()); return list; }}改造StudentController,记录执行时间
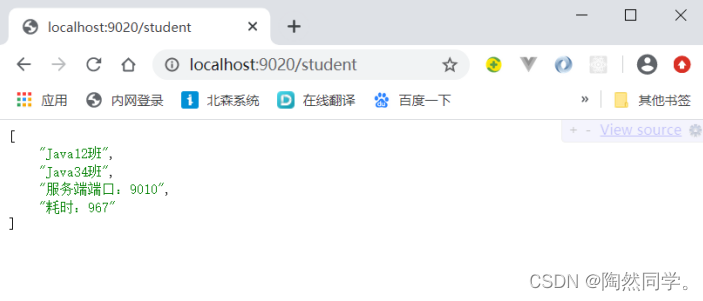
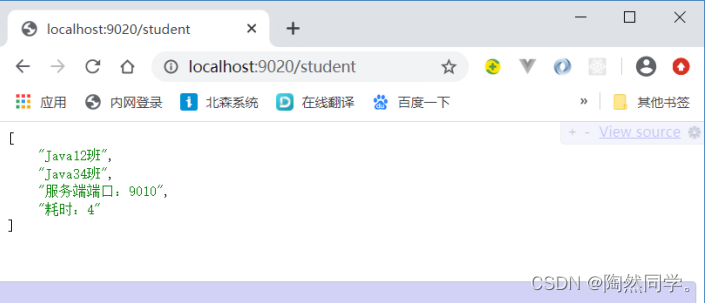
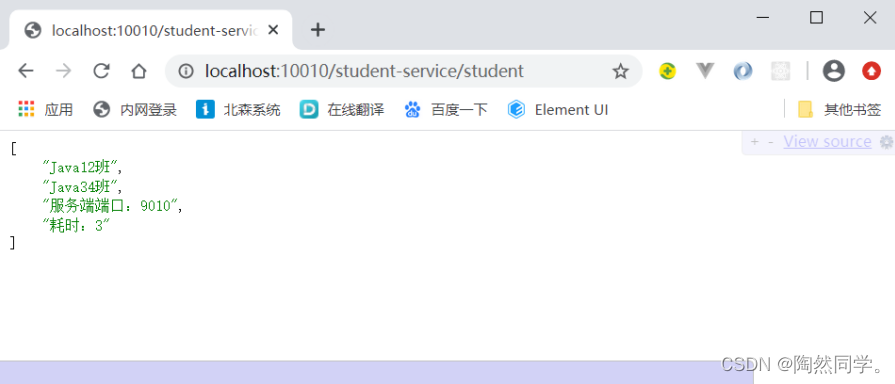
package com.czxy.controller;import com.czxy.service.StudentService;import org.springframework.web.bind.annotation.GetMapping;import org.springframework.web.bind.annotation.RequestMapping;import org.springframework.web.bind.annotation.RestController;import javax.annotation.Resource;import java.util.List;/** * @author 桐叔 * @email [email protected] */@RestController@RequestMapping("/student")public class StudentController { @Resource private StudentService studentService; @GetMapping public List findAll(){ long start = System.currentTimeMillis(); List list = studentService.findAll(); long end = System.currentTimeMillis(); list.add("耗时:" + (end-start)); return list; }}启动测试
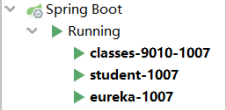
启动服务
如果超过1秒将使用“模拟数据”
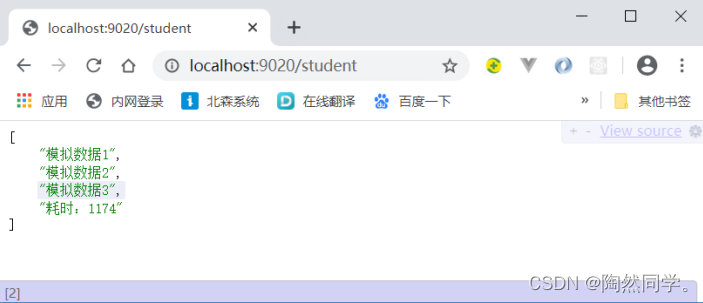
如果没有超过1秒,将使用查询结果的数据
面试题
如果熔断和重试机制,都配置,是都生效?还是某个生效?
经测试发现是熔断生效,为什么?
1. Ribbon重试机制的超时时间设置的是1000ms:
2.Hystix的超时时间默认也是1000ms
3.实际执行后发现,没有触发重试机制,而是先触发了熔断。
- 所以,Ribbon的超时时间一定要小于Hystix的超时时间。
我们可以通过hystrix.command.default.execution.isolation.thread.timeoutInMilliseconds来设置
# Hystrix超时时间。hystrix: command: default: execution: isolation: thread: timeoutInMilliseconds: 3000 # 设置hystrix的超时时间为3000msFeign
在前面的学习中,我们使用了Ribbon的负载均衡功能,大大简化了远程调用时的代码:
restTemplate.getForEntity("http://classes-service/classes", List.class);
如果就学到这里,你可能以后需要编写类似的大量重复代码,格式基本相同,无非参数不一样。有没有更优雅的方式,来对这些代码再次优化呢?
这就是我们接下来要学的Feign的功能了。
简介
Feign是一种声明式、模板化的HTTP客户端。
在SpringCloud中使用Feign,我们可以做到使用HTTP请求远程服务时能与调用本地方法一样的编码体验,开发者完全感知不到这是远程方法,更感知不到这是个HTTP请求。
快速入门
导入依赖
org.springframework.cloud spring-cloud-starter-openfeign开启Feign功能
我们在启动类上,添加注解 @EnableFeignClients,开启Feign功能
package com.czxy;import org.springframework.boot.SpringApplication;import org.springframework.boot.autoconfigure.SpringBootApplication;import org.springframework.cloud.netflix.eureka.EnableEurekaClient;import org.springframework.cloud.netflix.hystrix.EnableHystrix;import org.springframework.cloud.openfeign.EnableFeignClients;@SpringBootApplication@EnableEurekaClient@EnableHystrix //开启熔断器@EnableFeignClients //开启feignpublic class StudentApplication { public static void main(String[] args) { SpringApplication.run(StudentApplication.class,args); }}Feign的客户端
- 通过@FeignClient 声明Feign客户端。
- value : 用于设置服务名称
- path:用于设置路径前缀(也就是controller配置的路径)
- Feign类似于MyBatis。
- @FeignClient类似 @Mapper注解。
- Feign中的方法需要与服务的方法声明完全一致。注意:路径
- Feign会根据注解帮我们生成URL。
步骤一:编写 ClassesFeign
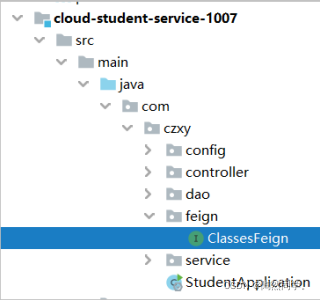
package com.czxy.feign;import org.springframework.cloud.openfeign.FeignClient;import org.springframework.web.bind.annotation.GetMapping;import java.util.List;@FeignClient(value="classes-service",path="/classes")public interface ClassesFeign { @GetMapping public List findAll();}修改StudentService,不再调用ClassesDao,直接使用
package com.czxy.service;import com.czxy.dao.ClassesDao;import com.czxy.feign.ClassesFeign;import org.springframework.stereotype.Service;import javax.annotation.Resource;import java.util.List;@Servicepublic class StudentService {// @Resource// private ClassesDao classesDao; @Resource private ClassesFeign classesFeign; public List findAll() {// return classesDao.findAll(); return classesFeign.findAll(); }}启动测试
正常访问
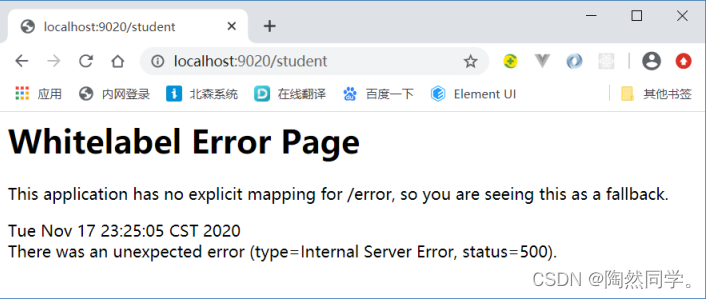
如果超时,抛异常
入门总结
第一步:导入Feign依赖
第二步:在StudentApplication启动类添加 @EnableFeginClients
第三步:编写Feign客户端 使用@FeignClient声明客户端 参数:value设置服务名称 path设置路径前缀(也就是controller配置的路径)
第四步:在controller中使用Feign客户端发起远程请求调用
负载均衡
之前使用RestTemplate进行远程调用时,需要添加额外注解来完成负载均衡处理。
Feign中本身已经集成了Ribbon依赖,不需要额外引入依赖,就可以完成负载均衡处理。采用之前的配置就可以。
classes-service: ribbon: ConnectTimeout: 250 # Ribbon的连接超时时间 ReadTimeout: 1000 # Ribbon的数据读取超时时间 OkToRetryOnAllOperations: true # 是否对所有操作都进行重试 MaxAutoRetriesNextServer: 1 # 切换实例的重试次数 MaxAutoRetries: 1 # 对当前实例的重试次数另外,还可以使用ribbon.xx来进行ribbon的全局配置。
Hystrix支持
Feign默认也有对Hystix的集成,只不过,默认情况下是关闭的。
我们需要通过下面的参数来开启:
feign: hystrix: enabled: true # 开启Feign的熔断功能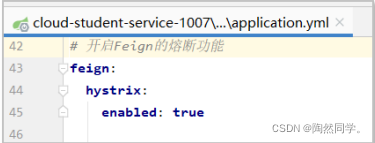
但是,Feign中的Fallback配置不像Ribbon中那样简单了。
首先,我们要定义一个类,实现DataFeign接口,作为fallback的处理类
package com.czxy.feign;import org.springframework.stereotype.Component;import java.util.ArrayList;import java.util.List;email [email protected]@Componentpublic class ClassesFeignFallback implements ClassesFeign { @Override public List findAll() { List list = new ArrayList(); list.add("模拟数据111"); list.add("模拟数据222"); list.add("模拟数据333"); return list; }}然后在DataFeign中,指定刚才编写的实现类
package com.czxy.feign;import org.springframework.cloud.openfeign.FeignClient;import org.springframework.web.bind.annotation.GetMapping;import java.util.List;@FeignClient(value="classes-service",path="/classes" ,fallback = ClassesFeignFallback.class )public interface ClassesFeign { @GetMapping public List findAll();}重启测试:
请求压缩(了解)
Spring Cloud Feign 支持对请求和响应进行GZIP压缩,以减少通信过程中的性能损耗。通过下面的参数即可开启请求与响应的压缩功能:
feign: compression: request: enabled: true # 开启请求压缩 response: enabled: true # 开启响应压缩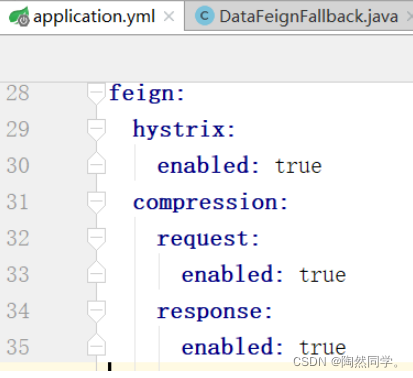
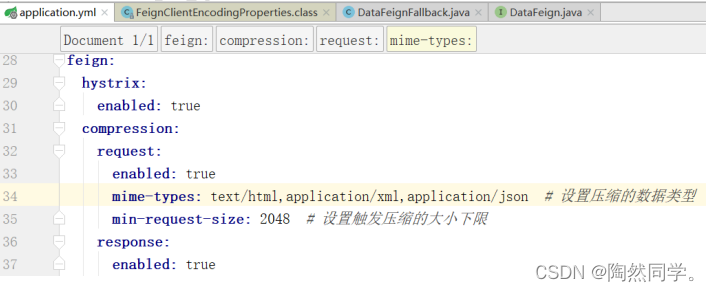
同时,我们也可以对请求的数据类型,以及触发压缩的大小下限进行设置:
feign: compression: request: enabled: true # 开启请求压缩 mime-types: text/html,application/xml,application/json # 设置压缩的数据类型 min-request-size: 2048 # 设置触发压缩的大小下限注:上面的数据类型、压缩大小下限均为默认值。
 日志级别(了解)
前面讲过,通过logging.level.xx=debug来设置日志级别。然而这个对Fegin客户端而言不会产生效果。因为@FeignClient注解修改的客户端在被代理时,都会创建一个新的Fegin.Logger实例。我们需要额外指定这个日志的级别才可以。
设置com.czxy包下的日志级别都为debug
logging: level: com: czxy: feign: debug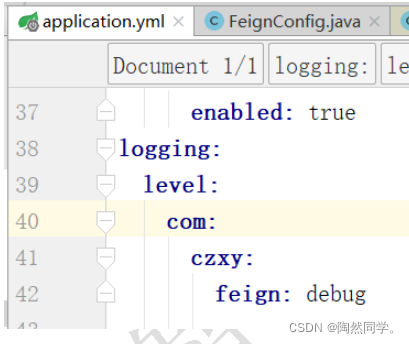
编写配置类,定义日志级别
package com.czxy.config;import feign.Logger;import org.springframework.context.annotation.Bean;import org.springframework.context.annotation.Configuration;@Configurationpublic class FeignConfig { @Bean public Logger.Level feignLoggerLevel(){ return Logger.Level.FULL; }}这里指定的Level级别是FULL,Feign支持4种级别:
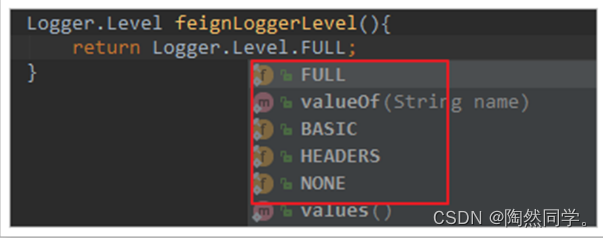
- NONE:不记录任何日志信息,这是默认值。
- BASIC:仅记录请求的方法,URL以及响应状态码和执行时间
- HEADERS:在BASIC的基础上,额外记录了请求和响应的头信息
- FULL:记录所有请求和响应的明细,包括头信息、请求体、元数据。
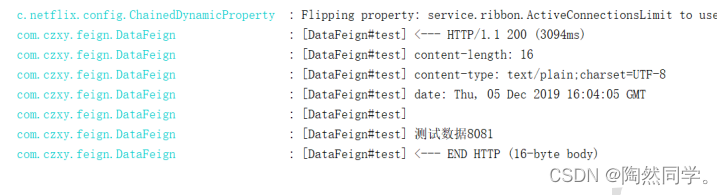
在FeignClient中指定配置类:
/** * Created by liangtong. */@FeignClient(value="service",path="/test",fallback = DataFeignFallback.class,configuration = FeignConfig.class)public interface DataFeign { @GetMapping public ResponseEntity test();}重启项目,即可看到每次访问的日志:
Zull网关
简介
官网:https://github.com/Netflix/zuul

Zuul:维基百科:
电影《捉鬼敢死队》中的怪兽,Zuul,在纽约引发了巨大骚乱。
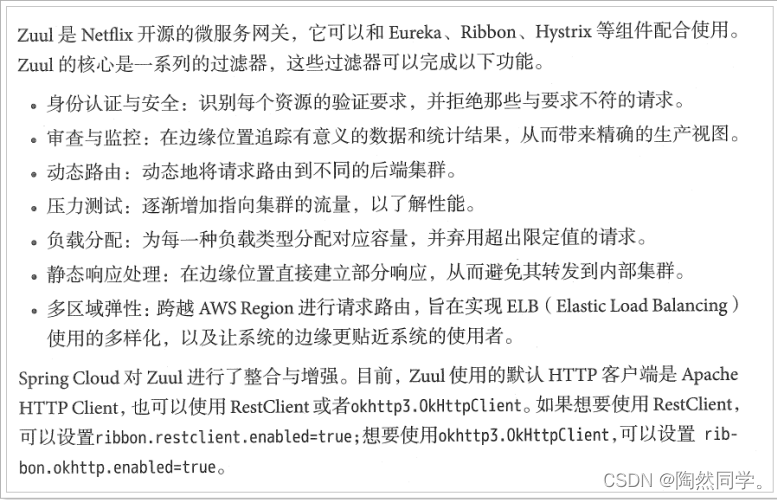
事实上,在微服务架构中,Zuul就是守门的大Boss!一夫当关,万夫莫开!
Zull加入后的框架
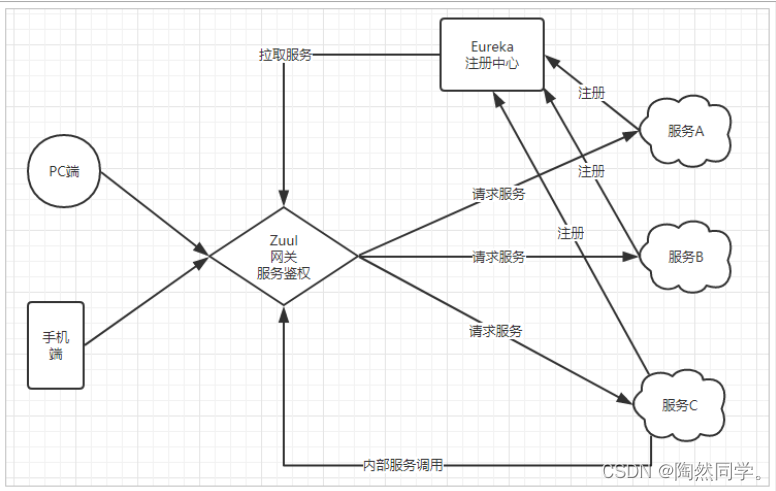
- 不管是来自于客户端(PC或移动端)的请求,还是服务内部调用。一切对服务的请求都会经过Zuul这个网关,然后再由网关来实现 鉴权、动态路由等等操作。Zuul就是我们服务的统一入口。
快速入门--路由转发
新建工程
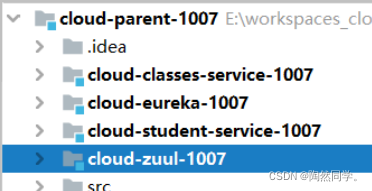
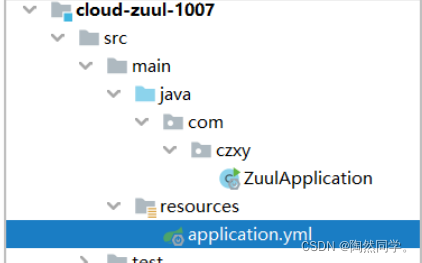
创建项目:cloud-zuul-1007
添加坐标
org.springframework.cloud spring-cloud-starter-netflix-zuul org.springframework.boot spring-boot-starter-test 编写启动类
通过@EnableZuulProxy注解开启Zuul的功能:
package com.czxy;import org.springframework.boot.SpringApplication;import org.springframework.boot.autoconfigure.SpringBootApplication;import org.springframework.cloud.netflix.zuul.EnableZuulProxy;@SpringBootApplication@EnableZuulProxypublic class ZuulApplication { public static void main(String[] args) { SpringApplication.run(ZuulApplication.class,args); }}编写配置
# 服务端口号server: port: 10010# 服务名spring: application: name: zuul编写路由规则
我们需要用Zuul来代理classes-service服务,先看一下控制面板中的服务状态:
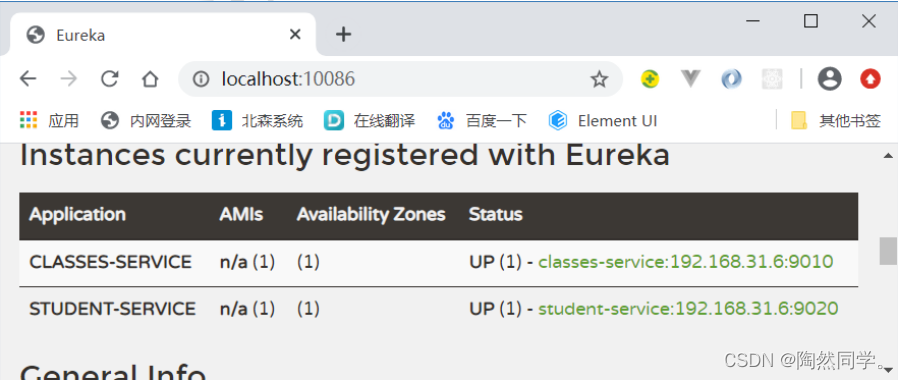
- ip为:127.0.0.1
- 端口为:9010
映射规则:
zuul: routes: service: path: /service/** url: http://localhost:9010zuul.routes.服务名.path= /前缀/**
zull.routers.服务名.url= 路径
我们将符合path 规则的一切请求,都代理到 url参数指定的地址
启动测试
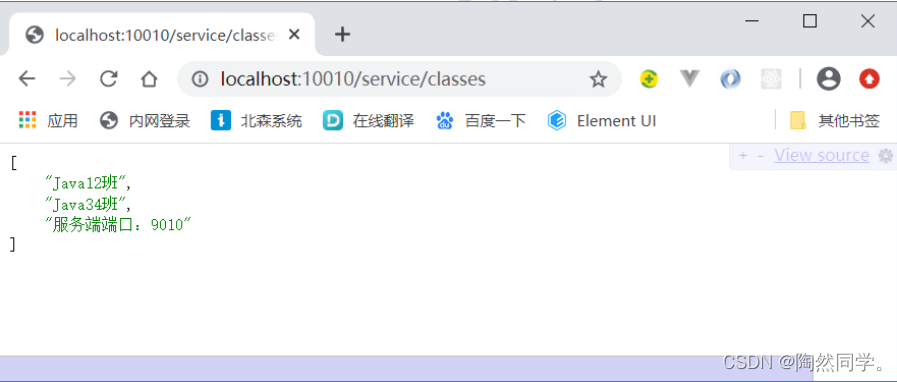
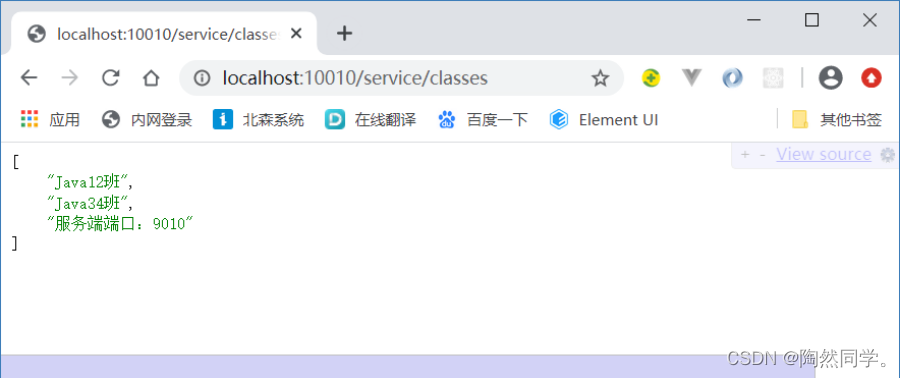
访问的路径中需要加上配置规则的映射路径,我们访问:
http://localhost:10010/service/classes
面向服务的路由
在刚才的路由规则中,我们把路径对应的服务地址写死了!如果同一服务有多个实例的话,这样做显然就不合理了。
我们应该根据服务的名称,去Eureka注册中心查找 服务对应的所有实例列表,然后进行动态路由才对!
添加Eureka客户端依赖
org.springframework.cloud spring-cloud-starter-netflix-eureka-client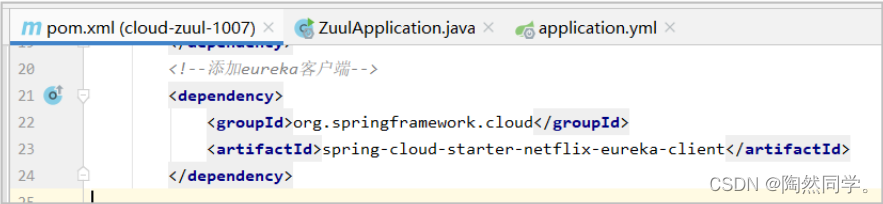
开启Eureka客户端发现功能
package com.czxy;import org.springframework.boot.SpringApplication;import org.springframework.boot.autoconfigure.SpringBootApplication;import org.springframework.cloud.netflix.eureka.EnableEurekaClient;import org.springframework.cloud.netflix.zuul.EnableZuulProxy;@SpringBootApplication@EnableZuulProxy //开启zuul代理@EnableEurekaClient //开启eureka客户端public class ZuulApplication { public static void main(String[] args) { SpringApplication.run(ZuulApplication.class,args); }}添加Eureka配置 获取服务信息
#eureka配置eureka: client: service-url: defaultZone: http://localhost:10086/eureka registry-fetch-interval-seconds: 5 instance: prefer-ip-address: true #是否注册ip地址 ip-address: 127.0.0.1 #注册的IP地址修改映射配置 通过服务名获取
因为已经有了Eureka客户端,我们可以从Eureka获取服务的地址信息,因此映射时无需指定IP地址,而是通过服务名称来访问
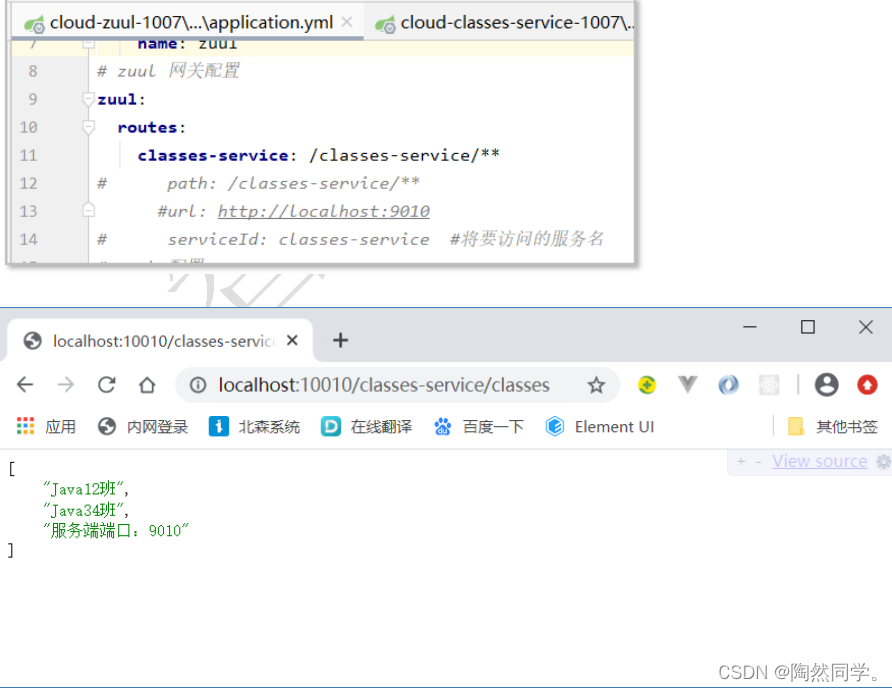
#路由配置zuul: routes: service: path: /service/** #zuul拦截的路径# url: http://localhost:9010 serviceId: service #将要访问的服务名启动测试
简化的路由配置
在刚才的配置中,我们的规则是这样的:
- zuul.routes..path=/xxx/**: 来指定映射路径。是自定义的路由名
- zuul.routes..serviceId=service:来指定服务名。
而大多数情况下,我们的路由名称往往和 服务名会写成一样的。因此Zuul就提供了一种简化的配置语法:zuul.routes.=
比方说上面我们关于user-service的配置可以简化为一条:
# zuul 网关配置路由配置zuul: routes: classes-service: /classes-service/**省去了对服务名称的配置。
默认的路由规则
在使用Zuul的过程中,上面讲述的规则已经大大的简化了配置项。但是当服务较多时,配置也是比较繁琐的。因此Zuul就指定了默认的路由规则:
- 默认情况下,一切服务的映射路径就是服务名本身。
- 例如服务名为:service,则默认的映射路径就是:/service/**
也就是说,刚才的映射规则我们完全不配置也是OK的,不信就试试看
路由前缀
配置示例:
#路由配置zuul: prefix: /api routes: service: /service/** #zuul拦截的路径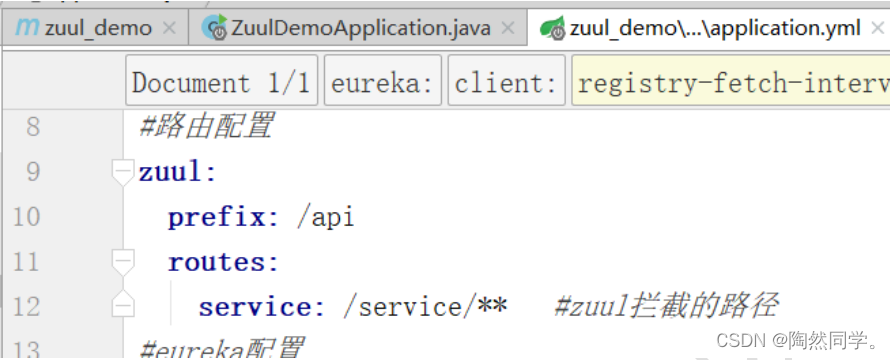
我们通过zuul.prefix=/api来指定了路由的前缀,这样在发起请求时,路径就要以/api开头。
路径/api/student-service/student将会被代理到/student-service/student

过滤器
Zuul作为网关的其中一个重要功能,就是实现请求的鉴权。而这个动作我们往往是通过Zuul提供的过滤器来实现的。
ZullFilter
ZuulFilter是过滤器的顶级父类。在这里我们看一下其中定义的4个最重要的方法:
public abstract ZuulFilter implements IZuulFilter{
abstract public String filterType(); //过滤器类型
abstract public int filterOrder(); //执行顺序
boolean shouldFilter(); //是否需要执行
Object run() throws ZuulException; //具体业务逻辑
}
- shouldFilter:返回一个Boolean值,判断该过滤器是否需要执行。返回true执行,返回false不执行。
- run:过滤器的具体业务逻辑。
- filterType:返回字符串,代表过滤器的类型。包含以下4种:
- pre:请求在被路由之前执行
- routing:在路由请求时调用
- post:在routing和errror过滤器之后调用
- error:处理请求时发生错误调用
- filterOrder:通过返回的int值来定义过滤器的执行顺序,数字越小优先级越高。
过滤器执行生命周期
这张是Zuul官网提供的请求生命周期图,清晰的表现了一个请求在各个过滤器的执行顺序。
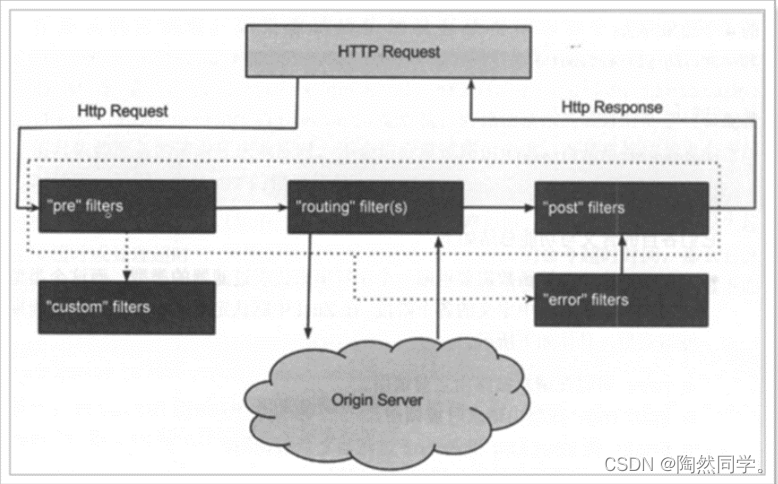
- 正常流程:
请求到达首先会经过pre类型过滤器,而后到达routing类型,进行路由,请求就到达真正的服务提供者,执行请求,返回结果后,会到达post过滤器。而后返回响应。
- 异常流程:
- 整个过程中,pre或者routing过滤器出现异常,都会直接进入error过滤器,再error处理完毕后,会将请求交给POST过滤器,最后返回给用户。
- 如果是error过滤器自己出现异常,最终也会进入POST过滤器,而后返回。
- 如果是POST过滤器出现异常,会跳转到error过滤器,但是与pre和routing不同的时,请求不会再到达POST过滤器了。
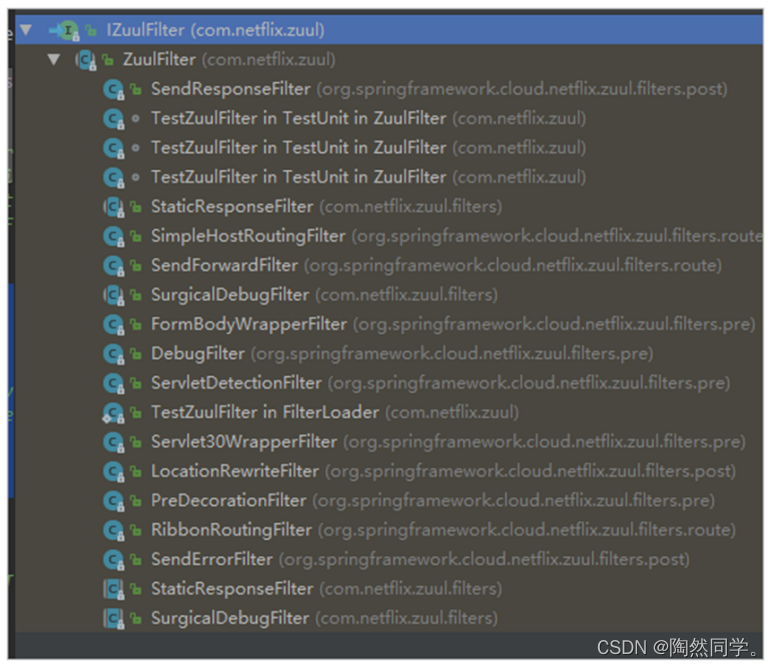
所有内置过滤器列表:
使用场景
场景非常多:
- 请求鉴权:一般放在pre类型,如果发现没有访问权限,直接就拦截了
- 异常处理:一般会在error类型和post类型过滤器中结合来处理。
服务调用时长统计:pre和post结合使用。
自定义过滤器
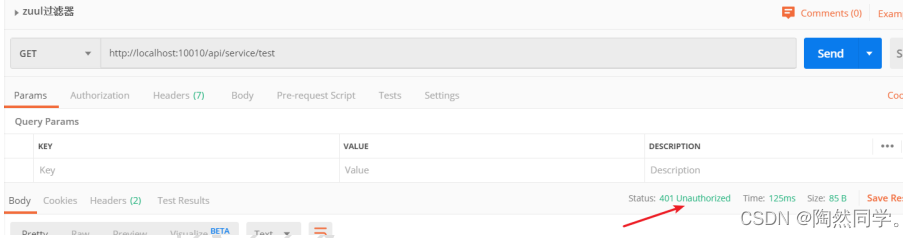
接下来我们来自定义一个过滤器,模拟一个登录的校验。基本逻辑:如果请求中有authorization请求头,则认为请求有效,放行。
定义过滤器类
package com.czxy.filter;import com.netflix.zuul.ZuulFilter;import com.netflix.zuul.context.RequestContext;import com.netflix.zuul.exception.ZuulException;import org.springframework.http.HttpStatus;import javax.servlet.http.HttpServletRequest;/** * Created by liangtong. */@Componentpublic class LoginFilter extends ZuulFilter { @Override public String filterType() { return "pre";//路由之前执行 } @Override public int filterOrder() { return 1; //排序 } @Override public boolean shouldFilter() { return true; //是否进行过滤,true将执行run()方法 } @Override public Object run() throws ZuulException { //1 获得上下文对象 RequestContext requestContext = RequestContext.getCurrentContext(); //2 获得请求对象 HttpServletRequest request = requestContext.getRequest(); //3 获得指定的请求头 String token = request.getHeader("authorization"); //如果没有token返回401 if(token == null || "".equals(token)) { requestContext.setSendZuulResponse(false); requestContext.setResponseStatusCode(HttpStatus.UNAUTHORIZED.value()); } return null; }}测试
没有token
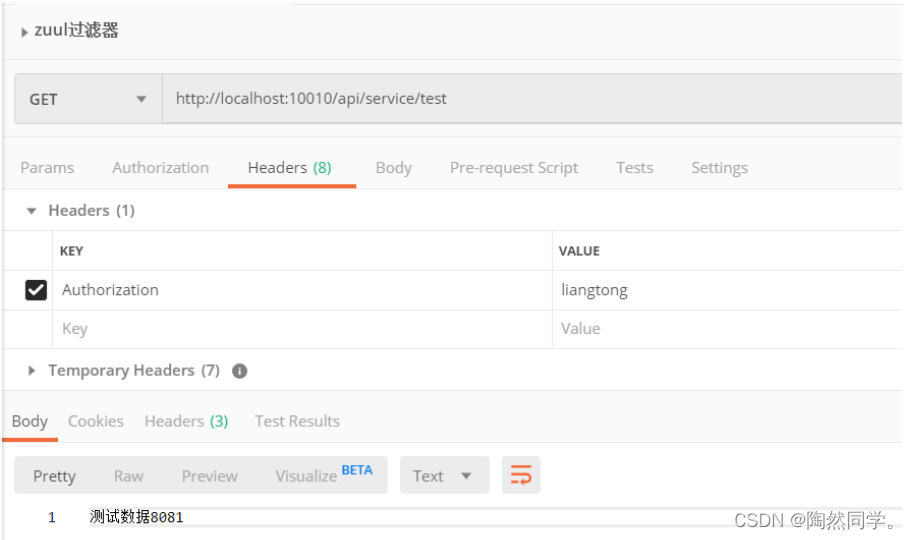
有token
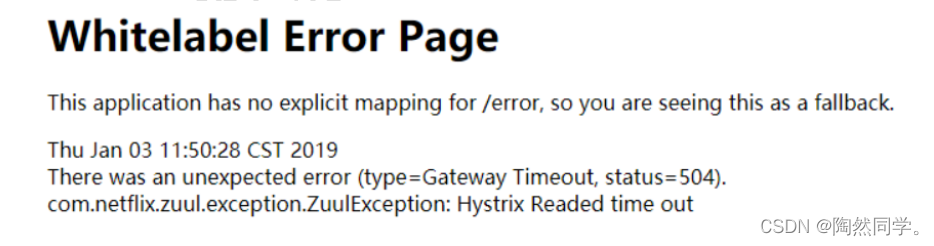
负载均衡和熔断
Zuul中默认就已经集成了Ribbon负载均衡和Hystix熔断机制。但是所有的超时策略都是走的默认值,比如熔断超时时间只有1S,很容易就触发了。因此建议我们手动进行配置:
#网关配置zuul: retryable: true #开启重试(注意:检查之前是否配置zuul,如果配置需要合并配置项)#全局负载均衡配置ribbon: ConnectTimeout: 250 # 连接超时时间(ms) ReadTimeout: 2000 # 通信超时时间(ms) OkToRetryOnAllOperations: true # 是否对所有操作重试 MaxAutoRetriesNextServer: 2 # 同一服务不同实例的重试次数 MaxAutoRetries: 1 # 同一实例的重试次数#熔断hystrix: command: default: execution: isolation: thread:timeoutInMillisecond: 6000 # 熔断超时时长:6000ms后端代码
参考:SpringCloud之Eureka注册中心与Robbin负载均衡_陶然同学。-CSDN博客学习目标系统架构演变传统架构:单一应用集群:负载均衡分布式服务SOA架构:面向服务架构微服务初始SpringCloud什么是微服务什么是SpringCloudSpringCloud常见模块版本...https://blog.csdn.net/weixin_45481821/article/details/123424180?spm=1001.2014.3001.5502

